Happy Thanksgiving yall! Enjoy!
-Callie

Happy Thanksgiving yall! Enjoy!
-Callie
Oh how I love glitter duct tape. What a brilliant idea! I mean seriously, how did we not think of this before.
♥Easy ♥Cheap ♥No Mess ♥Versatile
Glitter duct tape is definitely a must have for DIY crafters. I went a little overboard with it in the beginning… light switches, door knobs, mirrors, candles, frames, handles. You get the point. I found the tape lasts longest on plastics.
Related: How To Make A Perfect Picture Collage


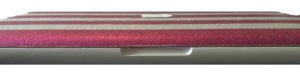
I glitterfied way to many things this summer. No regrets. My favorite result was my laptop.

It only takes a few minutes to create. All you need is glitter duct tape and scissors.I used the thin kind of tape to avoid chunky stripes.
 I cut the tape right at the edges so it would have a natural finish.
The logo is the only tricky part. I just cut around the tape, but it took a few tries. I recommend planning that part out beforehand.
Don’t worry about it ruining your laptop. It’s easy to take off and wont leave any marks.
And that’s it!! Easy right?!
Have a fantastic weekend.
-Callie
![]()
![]()
Good Morning Crafters,
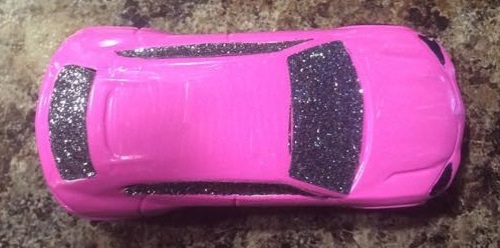
Today I’m doing something a little different: Hot Wheels DIY. Yes Hot Wheels. Be excited.

Related: How To Make A DVD Mosaic
Scissors » »

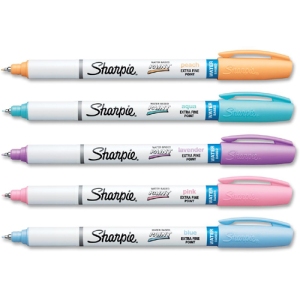
Sharpies » »

Paint Sharpies » »
Glitter Duct Tape » »

Anything else you have laying around. » »


Thanks for taking the time to read my post. If you decide to design one of your own, I would love to share them on my blog. Get to it crafters!
Until next time,
–Callie
![]()

♥ UPDATED VERSION COMING SOON ♥
Overwhelmed by wedding planning? Take a time-out. Make an inspiration board…super fun and super cheap. Not engaged? NBD, neither am I. Lets be honest girls… we think about our wedding all the time. There’s nothing wrong with a little creative fun.
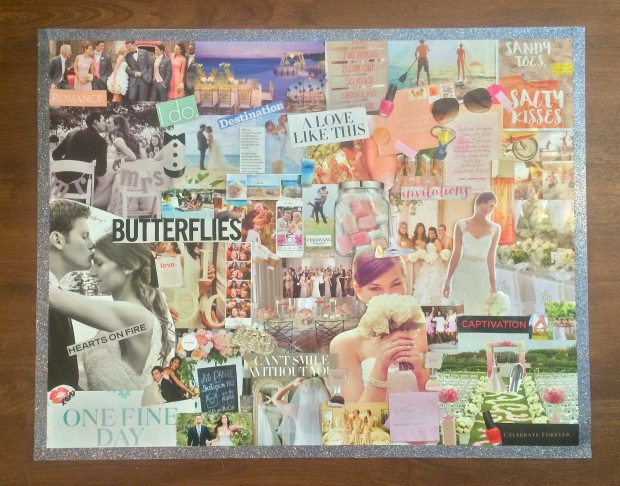
(photo and collage created by: Callie Boyette ©)
Related: Digital Wedding Collage Tutorial

![]()
 Four months ago I began my last year of college. Like most of my fellow seniors, I expected classes to be typical, and by typical, I mean boring. You know the type… 3 Exams + 1 Final + teachers who hand you material to memorize, in which you promptly forget the day after the test. However, much to my surprise, one of my classes was not the norm and actually taught me something useful for life after college. Not to say that my other classes weren’t educational, but they didn’t excite me or push me. Among other things, my class introduced me to the world of blogging. Although I had a general understanding of blogs and undoubtably read various posts while skimming through facebook, the actual methods behind blogging were unknown to me. Luckily, my communications class came to the rescue and enlightened me on the tools of the trade.
The obvious tools that I found helpful were linking to other websites and posting to social media sites. Experience, however, was the best tool of all. At first I struggled to create unique and interesting posts. My OCD side went a little overboard, and my posts were a bit too long and complicated. I learned that simplicity is key… Steve Jobs would be proud.
Some the awesome DIY projects I got the create:


In the future, I plan to creat a tv/film blog that is more my style. Now that I have learned from my mistakes, I feel better equipt to write a decent blog. User interaction is also key. To have a successful blog you must think of your audience before yourself by asking, “What information would I want from a blog?” I won’t pretend to be an expert, but I think my passion gives me something to contribute to the blogging community. Furthermore, I will use the tools I have learned in class to promote myself in the film world after graduation. Having a successful blog is a great resume booster because it showcases your talents and provides insight to who you are and why you love what you love.
A TV/film blog I really like is Mettel Ray. She provides a unique style with modern attributes. Check out her blog and show some support!
Overall my blogging experience proved to be very educational, interesting, and, most of all, fun! Now it’s back to studying for finals. Good luck to everyone else whose days/nights consist of endless reading and studying flashcards. Hang in there!
Sincerly,
-Callie
I recently interviewed Katherine Boyette to get her thoughts on Creative Crafts by Callie.
See what she had to say by watching the video below.
-Callie
![]()
1. Crayons: They are great for both kids and adults. Click here for 35 crayon craft ideas (includes melted crayon project).

2. Markers: My favorite brand → Crayola Washable Markers $4.99 at Office Depot.
3. Sharpies: A must-have craft supply. Black sharpies are classic and sexy; colored sharpies are fun and cheerful; and metallic paint markers are elegant and sophisticated. I’m obsessed with DIY sharpie mugs!! If you are too, check out Pintrest board by clicking here. ♥

Reblogged from Craftaholics Anonymous. Image from Just Imagine.
Other Materials: Charcoal, Pastels, Ink.
4. Watercolors: They are most commonly applied to paper and make absolutely beautiful designs. Looking for inspiration? Check out the following links:

Image from The Cottage Market.
5. Tempera Paint: Tempera is a permanent and fast-drying. It’s also inexpensive and safe, making it great for kids. Surfaces: Wood, Glass, Canvas, Fabric, Paper.
6. Chalkboard Paint: It’s vintage. It’s versatile. It’s fabulous. From wedding DIY to kids crafts, chalkboard paint can do it all. Pst…it also makes great [cheap] gifts. ♥

Image from Buzzfeed.
Other Paints: Glow-In-The-Dark-Paint, Acrylic Paint, Washable Kids Paint.
7. Yarn, String, Thread: Always a must for any DIY crafter. You never know when they will come in handy. Check out this awesome Buzzfeed post for 32 Awesome DIY Yarn Projects.
8. Felt: You can make so many cute felt crafts. They make great presents for kids and are inexpensive.
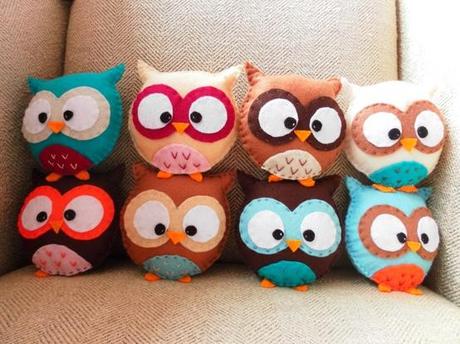
“Top 10 Cutest Felt Crafts”.Click here to see more.
 “Felt Freeze Pop Sabers”. Click here to see more.
9. Lace & Denim: Try something different and use lace or denim for a craft project. If you rifle through your closet, I bet you can find a few items you can transform into awesome crafts.
10. Gems/Jewels: These are an obvious must. There are tons of crafts that involve gems and jewels. Check out this super cool how-to article by clicking here.
11. Sequins: Chic. Sparkly. Fabulous. Need I say more. ♥

Love this! “DIY Sequin Elbow Patch Sweater” by A Pare & A Spare.
12. Pom Poms: Poms are essential. You can create very unique crafts with them. Poms are also perfect for parties.

How cool is this chair? Article: “Pom-Pom Furniture”; Posted by: Caroline Williamson.
Other Materials: Pipe Cleaners, Buttons, Beads, Feathers.
13. Glitter: I love it. You love it. The end. ♥
14. Popsicle Sticks: A must-have. Popsicle sticks serve many functions, from flower holders to picture frames.

“20 Amazing Popsicle Stick Projects” by Babble.
15. Confetti: One of the funniest craft supplies ever! So many projects, so little time. Check this out: DIY Confetti Bowl.
Other Materials: Wood shapes, Stencils, Craft Foam, Ribbon, Clay, Balloons.
16. Mod Podge: It’s Mod Podge y’all. My favorite craft supply. Use it as a gloss, as a sealer, or as a glue. It keeps crafts looking pretty and professional. If you don’t have it, get it. You can buy Mod Podge at Michaels, Hobby Lobby, and other craft stores. ♥
17. Tacky Glue (just info): Reliable, non-toxic, fast-drying. Tacky glue has been used in homes for decades. Surfaces: Metal, Wood, Paper, Ceramaics.
18. Painter’s Tape: This is incredible helpful when making painted crafts, giving you flawless lines and gorgeous projects. Although it can be pricey, you should definitely invest in some good Painter’s Tape.

Image from RRR.
19. Ruler & Scissors (info): They are obvious, but must be mentioned.
20. Paintbrushes: Good paintbrushes are hard to find so take some extra time to research what brush is right for your project.
21. Glue Gun/Glue Sticks: I like to use mini glue guns because they are cheaper…and cuter:p

Buy this Mini Glue Gun at Hobby Lobby for $3.99.
Other Tools: Hole Punch, Wire Clippers, Rubber Stamps, Cutting Mat, Xacto Knife.
22. Construction Paper: You can find it at any crafting store.
23. Colored Tissue Paper: One of my favorite projects…Pom Poms. Click here to find out how to make them. ♥
24. Clear Contact Paper: Buy it here.
Other Paper: Copy Paper, Origami Paper, Poster Board.
25. Mason Jars: DUH!! ♥
26. Cardboard Boxes: They can be used for anything.
27. Magazines & DVD’s: Magazines are great for collages and DVD’s are great for mosaics. Check out my recent blog post “How-To Create a Mosaic Using DVD’s”.

Image by Creative Crafts by Callie.
Other Materials: Egg Cartons, Brown Paper Bags, Newspaper, Bubble Wrap, Toothpicks, Cotton Balls.
Thanks for reading! Have a fabulous day!
-Callie
![]()
Hello lovely readers! I’m doing something a little different today; I’m reviewing a fellow DIY blogger. Why you ask? Because I love finding other up-and-coming bloggers and sharing with the world their unique vision of DIY crafting. How awesome is it to find someone whose interested in the same hobby as you? It’s hella awesome (yes im dorky). When you find such bloggers, I think that it’s important to show support and encouragement. So, with out further ado, let me introduce you to

(Click the above image to view the blog.)
SHELBYTRIES is a DIY craft blog that’s great for college students and other individuals with busy lives. Her projects include fun materials, like chalkboard paint and gold spray paint. This is a must-check-out-blog!!!
I absolutely love her projects involving chalkboard paint. Such a fun idea!! I think chalkboard is great because it’s old-school and elegant, a perfect combo. I may use her as inspiration for my next blog post. There are two DIY chalkboard paint projects of hers that I love, a storage container and tea jars.

(Shelby’s DIY chalkboard paint storage container.)
Storage Container: How cool is this?! Using chalkboard paint on a storage container is a great way to spruce up your bedroom, closet, or dorm room, giving it that homey feel. I also love how she wrote in cursive to give her project a personal touch. Click here to see how she made it!
Tea Jars: Chalkboard Tea Jars are just adorable! I like how she used them to organize her spices. This is a must try! Click here to see for yourself.

(Shelby’s cute and cozy dorm room.)
I really like how all her DIY projects are simple and easy to create, making them perfect for college students. Pintrest is overloaded with awesome, but complicated craft ideas. It’s rare to find crafting projects like hers that are both simple and beautiful.
Coodos to Shelby for her stylish dorm room decor (pictured to the left) – pretty lights, cozy bed, and well-organized “mini-closet” under her bed…yes please!!
Click here to check out her cool post about DIY coffee mug designs. Hint: They include gold spray-paint…enough said.
“I really like making a mess too, so I hope you’ll stick around to see what havoc I wreak..”
-Shelby Jimenez
I love this!! I think it’s great that she has a “messy” crafting environment. If you aren’t comfortable making a mess then you shouldn’t be crafting. You go girl!
Quality pictures are a must for any blog, and this girl is doing it right. Her pictures are well-framed, pretty, and intriguing. They make me want to try her DIY projects and ask the question, “What will she think of next.”
DO SOMETHING NICE. SHOW SOME SUPPORT. FOLLOW SHELBYTRIES.


Thanks for stopping by y’all!
-Callie
![]()

(Sample Picture Collage)
Related: Wedding Inspiration Board

First things first: Choose your canvas, or background, for your collage.
A variety of backgrounds are available for collages and it’s important to choose the right one. Provided below is a list of my Do’s and Don’ts for collage backgrounds. I recommend planning out your collage before you begin your project to avoid mistakes.
DO’s
DON’T
Next, choose a theme. Let’s say, for example, you choose Valentine’s Day as your theme. To stay consistent, you could use…
Now you’re ready to choose a design layout. There are several options. Some examples are the following:
 Classic Layout
A Classic Layout is elegant and has defined borders that clearly show each picture. These are best for big events, such as weddings or graduations. It’s best to use only pictures, as opposed to magazine cut-outs, for this type of collage.
 Layered Layout
Layered Layouts are more creative. Using magazines or computer printed pictures for this collage is better than using camera pictures. Layered collages are great for personal projects and involve text. One example would be making a collage of your favorite television show. Pictured to the left is a sample Layered Layout created by yours truly of my favorite show Grey’s Anatomy.
 Scrapbook Layout
Scrapbook Layouts are also creative. They are best used for trips and events where keepsakes (recipets, tickets, etc.) are involved. For example, you could make a scrapbook collage of your family trip, including your plane tickets, guest list, etc as keepsakes. This adds another dimension to your collage and provides a unique way of keeping your special memories alive. Look at pintrest for creative ideas on how to make Scrapbook Layout.
 Shapes Layout
Shapes Layouts can be made with both personal pictures and other material. These are fun because they are completely left up to the crafter. Be unique and create something new. They make great gifts for special occasions, like birthdays, Valentine’s Day, etc.
Now that you have your canvas, design layout, and theme, it’s time to add a border. Why? A Border enhances the collage and brings everything together. Consider the layout and theme when choosing a border.
Tips
 Finally it’s time to add Mod Podge. Mod Podge is freakin awesome. It’s the stuff you probably used in art class back in elementary school. Apply a thin layer of Mod Podge to your completed collage to give it a shiny/glossy look. Mod Podge also keeps your collage protected and in place.
Buy Mod Podge online.
More info on Mod Podge.
Happy crafting y’all!
-Callie
![]()
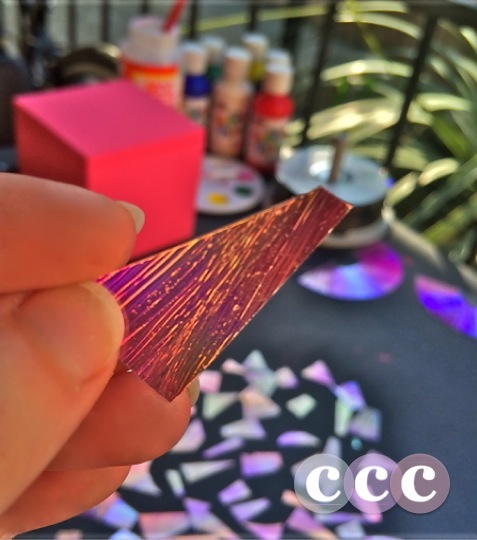
How cool is this? A Mosaic made from old DVD’s…GENIUS! Not only is it beautiful, but its cheap too. Mosaics are usually made out of glass, stones, etc. However, if you’re on a budget like me (broke college student and all), DVD’s serve as a great alternative. I decided to test the DVD method out on an old jewelry box that I had stuffed in the back of my closet.
Supplies Needed: DVD’s (I used about 20), scissors, Mod Podge (or clear gloss spray if you have the cash), and a small paint brush.

First I painted the jewelry box. I decided to go with pink because I thought it would be a good background color for the mosaic pieces.

I applied several coats of paint, waiting about 15-20 minutes in between each coat.
While I waited for each coat to dry, I started working on the mosaic pieces.  The number of DVD’s needed will vary, depending on the project. I used about 20 or so for mine.

*Fun Fact: DVD’s have two layers – the top layer, which is silver, and the bottom layer, which is clear. The top layer has the purple, shiny stuff that makes the mosaic look awesome. You won’t need the clear layer for the mosaic, but you may want to save it for a future project.

To make the separation processes easier, I cut them in half. I recommend working on this part outside (I learned the hard way lol).

Now the two layers can be separated. This can be a little tricky but stick with it. I used my nails to separate the edges and then gently pulled the rest apart.
 After that I applied Mod Podge to the DVD’s to keep the purple shiny stuff sealed on the disc. If you have the money, applying a clear gloss spray serves as a better sealer because it keeps the surface smooth.
 I applied the Mod Podge with a small paint brush and let them dry for 15-20 minutes.
 Then I cut the discs into pieces.
I experimented by cutting different shapes, but I recommend using similar cuts to make it easier to put the mosaic together. Weird angles can cause awkward spaces.


Look at all the pretty colors!
 After all the pieces were cut, I began to piece together my mosaic. I applied a thin layer of mod podge to the back of the pieces and then firmly pressed them to the box for about 10-15 seconds.
This was my finished project:


Click here to see the blog post that inspired me.
Thanks for checking out my post. Check back next week for a brand new D.I.Y. project.
-Callie
![]()
two is better than one.
There are thousands of people over at Soberistas.com supporting one another in achieving a happy and healthy alcohol-free life. You can find out more about joining our online community at soberistas.com
Beauty, Fashion, Lifestyle
D - I - WHY
